Monday, December 28, 2009

More progress...

Another day, another inch gained on progress.

We started out today shopping.. what else? I stocked up on aluminum flashing, rivet gun, some aluminum rivets, RTV, a metal mesh trash can, dimmer switch (wow those got expensive) and a few other odds n' ends.

I had some very successful tests today with the elements... I've got them completely detached from the original heater circuit board and have been able to use the dimmer switch to adjust the voltage from off to about 120VAC, just like the dimmer is supposed to do! Yeah, I'm excited about it... things normally don't work like they should with me.

The sad note is the AC fan doesn't react well at all to the dimmer. I think that gets into the whole "no torque at lower voltages" curse of AC motors... the fan won't engage until the dimmer switch is at about 95%.

I've decided the easiest way to attach the elements will most likely to be to mount them to the lower grate that came with the grill. There are a few little logistical hoo-rahs I'll need to deal with, but it just might work. I'll find out tomorrow night how badly the static elements will melt the RTV.

I gooped up beads of RTV on the lower grate. I then cut out a 12" diameter circle of flashing and the outline for the spot to mount the elements.


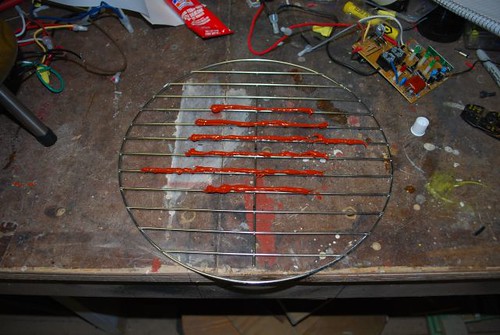
(The RTV on the grate)


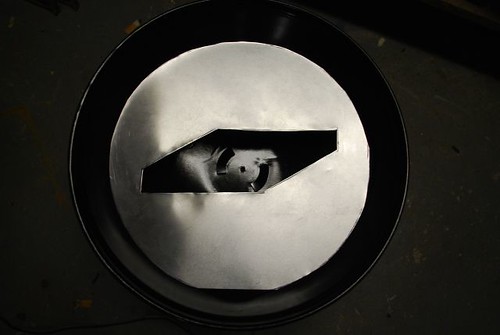
(The cut-out for the elements)


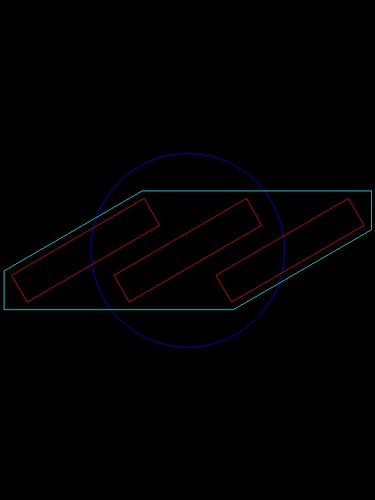
Above is the design, showing the layout of the elements (in red). The blue circle is the fan shroud. I'm going to "persuade" the flashing to conform to an airshroud skirt of some sort to direct all the airflow up.

I went with 30* angle on the elements.. it creates more than an inch of overlap for the element coverage, which places a majority of the elements directly over the 4.5" fan.

Once I'm able to get all this assembled and figure out how hot I can make it in there, I'll start on drum design.

Sunday, December 27, 2009

Design Update

I managed to find a free CAD program... "DoubleCAD XT". It acts a lot like AutoCAD (I have 6 years experience on AutoCAD), so I'm doing what I can to draft up some ideas, of which I have many...

My to-do list for tomorrow is:
1) Check the ohms across the elements.
2) See how much heat the elements retain when air is forced across them.
3) Investigate some high-temp RTV and see if it melts when in direct contact with the elements.
4) Do up a dimmer switch setup to see if I can use the elements on a simple dimmer.

If the RTV works, then I'll be able to punch out a bracket of sorts from some SS or aluminum, make the airflow scoop and install all that into the roaster to start testing temps. If all the above is successful, or at least quasi-successful, I'll focus on the drum and drum motor assembly...

Worst case, I have a heat gun and access to a bread machine.

ABSOLUTE worst case, I have my 60g a pop popper. :-)

Design so far:


Referencing the above picture:

This is a side-view of the roaster-to-be. The shape of the grill should be obvious. The "rectangle" at the top is a 9"x4" roasting drum.

The light blue underneath the drum is the airflow skirt I'm working on. It may or may not work.

The "fill" surrounding the airflow skirt is insulation. I want to keep heat off the bottom of this thing. More insulation will most likely be added... haven't reached that point in the design yet though.

The magenta line is just a reference center line.


This is viewing the roaster from above. The big circle is the 14" diameter rim. Lots of exciting stuff here. The "rectangle" again is the 9" x 4" roasting drum. It is also the dimensions of the top part of the airflow skirt. The blue circle in the middle is the bottom of the airflow skirt/fan shroud.

The three red rectangles are the elements, set at a 45 degree angle to cover the entire length and wide of the roaster. I don't know yet if the fan will be strong enough to push air through the "coils" of the elements, or if I will have to somehow suspend the elements over the fan area.

The theory is the airflow skirt will help to focus airflow through and around the elements, providing 1500 delicious watts of cozy warmth to bathe the beans in the drum above.

Off and running... again...

Time to get serious. Like *really* serious about having some fun with roasting.

A trip to one of the local Marden's netted some cool stuff... a 14" portable charcoal grill and a Bionaire BCH4138 "triple ceramic" heater.

I didn't think to grab the camera until after I started dissembling the heater, but quickly got caught up.

Our Bionaire looks a lot like this one (this is the -U model, which has an LCD display on the top.. ours has LED indicators).

After a little tinkering, I figured out that the "safety switch" wasn't working properly, so I disconnected it and hooked the wires together. Started right up. The fan seems to push a decent amount of air, which I am going to attempt to work into the design somehow, and the elements heated right up. According to my measurements (which I still don't know if I'm doing right with my multimeter), the elements got *really* hot. Like 1900 degrees hot. Nice. Now I have to keep the heat moving away from the elements.

For giggles, I checked the AC voltage on the elements. On the "low" setting, they were reading between 68-70 VAC. I clicked the unit onto "high" and they were reading 115-118 VAC. This is inspiring, since I'm assuming I will be able to use a simple dimmer switch (for now) to control the heat.

The 14" portable charcoal grill is just that. Not fancy, not high quality (what do you expect for $5?), but it will work. I'm going to be removing the "drip pan" from the legs and fashioning the legs with some aluminum (if I have any) panels to hold switches, etc., as well as to give the roaster more stability. Now that I have the parts (and a bread machine available if I want it), I need to figure out the *best* way to do all this. I'm leaning way towards a drum roaster with this, pushing the hot air up through the drum with the fan.

The super-awesomeness of this whole thing is the fact that the way it's coming together, I'm sure it will get PID'd at some point, assuming this thing even works...


...to be continued...

Saturday, December 26, 2009

Southwestern Coffee Chili

The last two days, the house has been filled with wonderful smells of roasting and brewing coffee. Actually, I have not been able to decide whether the coffee tastes or smells better. I can say that freshly roasted coffee is light years ahead of any other coffee that we have tried.

Certainly, the challenge of creating a bigger, better, shinier coffee roaster has distilled itself into Jon's brain and is creating the spirit of happily-mad scientist in him. The only downside to this being that every appliance in the house is being eyeballed with the glimmer of a Man who wants to know what is inside of it. :)

Although we have only just begun this bit of an experiment/journey into coffee-roasting, it appears that the roasting process itself is deceptively simple but with enough small nuances and possibilities to keep things interesting and exciting. There is so much to learn, about the roasting process itself, about the nuances of the coffees, about the related processes. Luckily, all through this experience there is the fresh fragrance of roasting coffee and the heady aroma of a freshly brewed pot.

I am especially enjoying the ability to explore the various fair trade coffees that are offered in their green form. Enjoying the friendliness of the online sites and their reporting of their journeys through the coffee farms and especially the pictorial representations.

In the spirit of Coffee Roasting experiments, I have tried to put together somewhat of a recipe for my Southwestern Coffee Chili as I cooked it this evening. It should of course be noted that I often don't cook by recipe but rather utilize smell and taste and a bit of chemistry practice to create meals.

Southwestern Coffee Chili

2-3 pounds stew meat (I used Moose meat from the very successful hunt the menfolk had this summer but have also used, beef stew meat, pork loin, and steak)
1/4 pound spicy sausage (optional)
3 stalks celery-diced
Medium onion-diced
1 green pepper-diced (optional)

2TBS onion powder
14 oz can diced tomatoes (I like the ones with chili's)
1 1/2 cups brewed, freshly roasted and ground coffee
1/2 tsp cayenne
1/8 cup honey
1/8 cup molasses
1/2-1 diced scotch bonnet pepper
4 cloves garlic
2 TBS Worcestershire sauce
4 tsp paprika

1 tsp salt (optional)
additional 1/2-1 tsp cayenne pepper (to taste)
fresh hot peppers or chili's 1-2 depending on heat and availability
1 cup water
1 cup black beans
1 cup white or kidney beans (whatever you have on hand)
1 cup corn
14 oz can diced tomatoes
1/4 cup whiskey, bourbon or brandy

Brown the meat at a med-high heat. Add the vegetables and saute until the onions are becoming clear.

add diced tomatoes, cayenne, onion powder, honey, molasses, scotch bonnet pepper, garlic, Worcestershire sauce and paprika. Bring to a slow simmer for 2-3 hours. add more water if necessary only.

Add remaining ingredients. Bring chili to a slow boil as this will cook off the alcohol simply allowing the alcohol to flavor the chili. Cook for an additional 20-30 minutes.

This chili is fairly thick, but I still thicken it a bit on occasion with 2TBS of cornstarch in 1/4 cup of cold water stirred slowly into the boiling chili.

Best served with sweet cornbread. (the homemade kind)

Day two...

pictures.

Just finished filling a "family order". Smells GOOD in the kitchen now...

Enjoying the fruits, as it were...

Sitting here, watching Law & Order, sipping a mish-mash blend of everything leftover from the roasting experiments from yesterday.

Folgers who?

:-D

Friday, December 25, 2009

The beginning

Christmas morning, I found a large burlap sack blazoned with "EL SALVADOR" in large, friendly letters under the christmas tree for me. Inside were wrapped packages containing a new experiment, which is quickly turning into an obsession.

Green coffee beans and a ton of information on home roasting.

Sign me up.

A few hours later, we had our old, completely unmodified, hot air popcorn popper loaded up with coffee beans. A bit of trial and error and some interesting precipitation of chaff, we ground and started tasting our fresh-roasted coffee. Below are some notes that we took.

Note: Don't roast and test too much coffee at one time. I'm still jittery from it.

Pictures

12/25.2009 – 1:30pm to 1:35pm
We are starting our first test roast ever. We are using:
• 1 heaping TBLSP “Colombian Patron” green beans.
• Stripped down “Mini Old Fashion Popcorn Maker”, model OFP-MINI.
o 2 tbsp grind
o 4 cups water (per coffee maker)

Batch #2:
• Using the rest of the “Colombian Patron” beans (just under ¼ cup).
• 1:40:30 – first crack
• 1:40:15 – Second crack, imminent fire?

Batch #3- (pretty darn good):
• Colombian Microlot ¼ cup – TOO MUCH??
• In @ 1:56:05
• First crack: 1:59:00
• Off about 2:01
o 2 tbsp grind
o 4 cups (per coffee maker)

Batch #4:
• Sweet Maria’s Espresso Monkey Blend ¼ cup
• In at 2:16:30pm
• First crack: 2:19:30pm
• Off at: 2:22:53pm

Batch #5:
• FT Peru ¼ cup
• In at: 2:35:00
• First crack: 2:38:10
• Off at: (lost track... we were too busy laughing)